How to Create an Animator Controller in Unity
Unity is a powerful game engine that allows developers to create stunning 2D and 3D games. One of the key elements of any game is animation, and Unity provides a wide range of tools for creating and managing animations. In this post, we're going to take a look at how to create an Animator Controller in Unity, which will give you the ability to control the animation of your game characters.
What is an Animator Controller?
Simply put, an Animator Controller is what allows you to create the logic for animations. It is the glue between the player input, code logic, and animations.
An Animator Controller is a Unity asset that controls the animation of a game object. It is a state machine that allows you to define different animations for different states and transitions between them. This makes it easy to create complex animation behaviors that respond to the player's input and the game's logic. Animator Controllers can be used to control anything from your main character, to coins, to your UI.
Step 1: Create a New Animator Controller
To first use an Animator Controller, an "Animation" component must be attached to the Game Object you're trying to animate. If your object has an avatar, this is where it will go as well.
To create a new Animator Controller, right-click in the Assets window and select "Create" > "Animator Controller". Give the controller a name and click "Create". The new controller will be added to your assets, and you can open it by double-clicking it in the Assets window.
Step 2: Add Animation Clips to the Controller
The next step is to add the animation clips that you want to use for your game character. You can do this by dragging and dropping the clips from the Assets window into the Animator Controller window. Once the clips are added, you can arrange them in the controller window to create the different states and transitions of the animation.
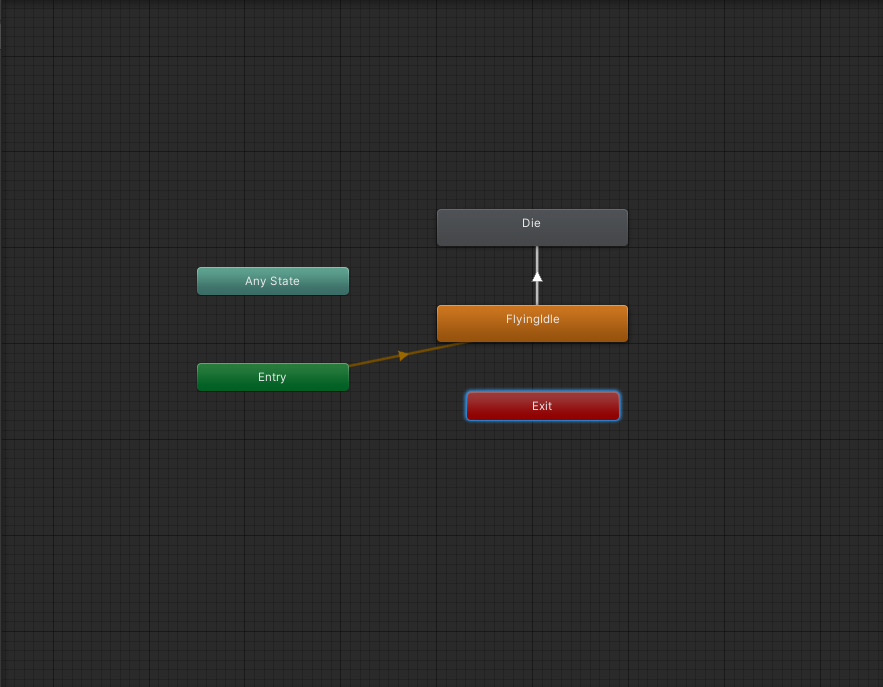
Step 3: Create Animation States
Once you have added your animation clips to the controller, you can create animation states for your game character. Each state represents a different animation and can have different properties.
To create a new state, right-click in the Animator Controller window and select "Create State" > "Empty". Give the state a name and drag the animation clip that you want to use for it into the "Motion" field. The first state you create will usually be your Idle state, and will begin animating when the game starts.
Step 4: Create Transitions
To create smooth animation transitions between different states, you need to create transitions between them. To do this, select the state that you want to transition from and right-click in the Animator Controller window. Select "Make Transition" and then click on the state that you want to transition to. You can also specify the conditions that need to be met for the transition to occur, such as a button press or a change in game state.
Transitions are where you can program logic to happen. You can create parameters in the Animator tab that you can then access in your code.
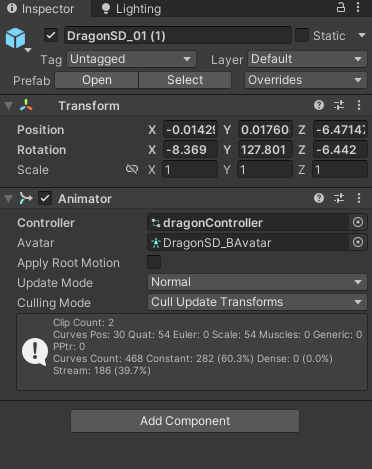
Step 5: Attach the Animator Controller to Your Game Object
Once you have finished creating your Animator Controller, you need to make sure to attach it to your game object. To do this, select your game object in the Unity scene and in the inspector window, look for an Animator Component and choose the controller you created on the controller field.
In conclusion, the Unity Animator Controller is a powerful tool for creating and managing animations in your games. By following these steps, you can create a controller that will allow you to control the animation of your game characters in a flexible and intuitive way. With a little practice and experimentation, you can create animations that will bring your game characters to life and take your game to the next level.